How to Cook a NY Steak in a Pan for a Crispy, Juicy Steakhouse Finish
Table of Contents
How to Cook a NY Steak in a Pan for a Crispy, Juicy Steakhouse Finish
There’s something magical about the first sizzle when meat hits hot oil. The crackle of a perfect crust and the aroma of garlic and herbs fill the air. Maybe you’ve watched chefs at a steakhouse, wondering: “Could I create that golden sear at home?” The answer is yes, and it’s simpler than you think.
Pan-searing a New York strip is easy without fancy gadgets or years of training. With the right approach, your stovetop can become a stage for restaurant-worthy results. It’s about heat control, timing, and trusting your instincts—skills any home cook can master. You don’t need sous-vide machines or special grills; just a heavy-bottomed skillet and pantry staples.
Imagine slicing into a steak with a caramelized exterior that gives way to a tender, pink center. This contrast of textures isn’t just for date nights out. By mastering technique—preheating your pan, letting the meat rest, and avoiding common pitfalls—you’ll unlock flavors that rival your favorite steakhouse. And the best part? You’re in control of every savory detail.
Key Takeaways
- Cast iron skillets deliver superior heat retention for even searing
- Patting the steak dry before cooking prevents steaming
- High smoke-point oils like avocado or grapeseed are essential
- Resist moving the steak during the initial sear for optimal crust
- Butter basting in the final minutes adds depth of flavor
- Resting time allows juices to redistribute evenly
- Internal temperature determines doneness more reliably than time
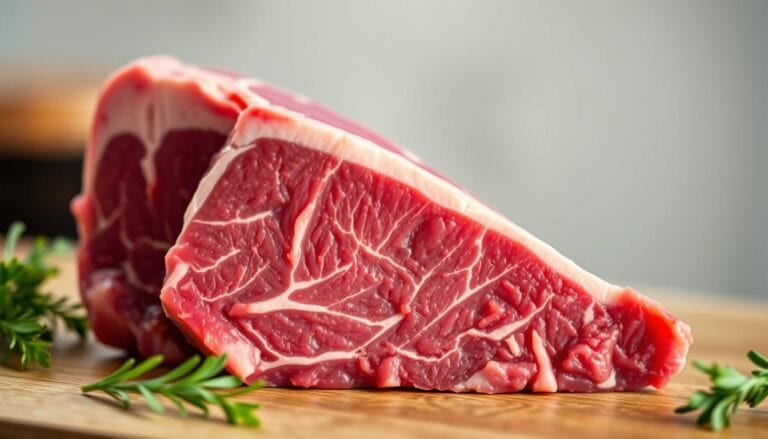
Choosing the Right NY Steak Cut
Your journey to steakhouse-quality results starts long before the pan heats up. The foundation of a perfect New York strip lies in selecting the ideal cut. Let’s break down what makes this steak unique and how to pick a winner every time.
Understanding Different Cuts
The New York strip stands out with its balanced marbling and firm texture. It’s not as tender as the filet mignon or as fatty as the ribeye. This cut offers a satisfying chew with rich beef flavor. Here’s how they compare:
| Cut | Marbling | Texture | Best For |
|---|---|---|---|
| New York Strip | Moderate | Firm | Pan-searing |
| Ribeye | Heavy | Buttery | Grilling |
| Filet Mignon | Light | Soft | Quick cooking |
For pan cooking, aim for 1-1.5-inch thick steaks. This thickness allows proper searing without overcooking the center. Thinner cuts risk drying out, while thicker ones might burn before reaching ideal doneness.
Selecting Quality Meat
Look for USDA Prime or Choice grades when shopping. Prime cuts have the most marbling, while Choice offers good quality at a lower price point. Check for these freshness indicators:
- Bright red color (no gray areas)
- Firm texture that springs back when pressed
- Fine white fat distributed evenly
Avoid steaks with excessive liquid in the package or strong odors. If you’re buying from a butcher, ask about dry-aged options – they develop deeper flavors but cost more. Remember: quality ingredients make all the difference in your new york strip steak recipe.
Essential Tools for Pan Cooking
Learning to cook strip steak on the stove begins with the right tools. The right gear affects heat, safety, and that perfect crust. Here’s what you need to make your kitchen a steakhouse.
Recommended Pans for Best Results
Cast iron skillets are top-notch for pan-searing. They keep heat evenly, ensuring a perfect sear. They take longer to heat up, but the result is worth it.
Stainless steel pans are great for quick heat control. They’re lighter and create tasty browned bits for sauces. Make sure they have a heavy base to avoid warping.
| Feature | Cast Iron | Stainless Steel |
|---|---|---|
| Heat Retention | Excellent | Good (with thick base) |
| Maintenance | Seasoning required | Dishwasher-safe |
| Best For | Steaks, cornbread | Pan sauces, quick adjustments |
Necessary Utensils and Accessories
Your toolkit needs three key items:
- Instant-read thermometer: Eliminates the guesswork of doneness
- Long-handled tongs: Flip steak without piercing it
- Splatter guard: Keeps your stovetop clean and safe
Remember a sharp chef’s knife for trimming and a cutting board with grooves. These tools help you cook strip steak on the stove perfectly every time.
Preparing Your Steak for Cooking
Learning how to prepare steak is key to becoming a great cook. Two important steps are seasoning and managing the temperature. These steps help your new york strip steak get that perfect crust and stay juicy inside.
Proper Seasoning Techniques
Dry brining works better than last-minute salting. Rub ¾ teaspoon kosher salt per pound into the steak 40 minutes before cooking. This method draws out moisture, then absorbs it with dissolved salt for deeper flavor.
Don’t make these seasoning mistakes:
- Using fine table salt (it over-salts surfaces)
- Adding pepper before searing (burns easily)
- Coating with oil too early (prevents crust formation)
Bringing Steak to Room Temperature
Let your steak sit uncovered for 30-45 minutes after seasoning. Cold meat straight from the fridge:
| Issue | Result | Solution |
|---|---|---|
| Contracts in pan | Uneven cooking | Tempering relaxes fibers |
| Steam buildup | Weak sear | Surface dries slightly |
| Internal shock | Tough texture | Gradual heat adjustment |
This waiting period isn’t about warming the center – it’s about stabilizing proteins. Think of it as letting your steak “acclimate to the idea of heat” for more controlled cooking.
The Right Cooking Oil to Use
Choosing the right cooking oil is key to a perfect crust on your NY steak. Oils with low smoke points burn fast, while high-heat options help create a sizzle. This sizzle is needed for caramelization without bitter flavors. Let’s explore which oils handle the heat and why this choice matters for every bite.
Best Oils for High-Heat Cooking
Avocado oil is the best choice with a smoke point of 520°F. It’s perfect for searing without setting off your smoke alarm. Clarified butter (ghee) comes next at 485°F, adding a rich nutty flavor to your steak. For those on a budget, refined vegetable oils like canola (400°F) or safflower (510°F) are good options.
| Oil Type | Smoke Point | Flavor Impact |
|---|---|---|
| Avocado Oil | 520°F | Neutral |
| Clarified Butter | 485°F | Nutty/Rich |
| Refined Canola | 400°F | Mild |
Why Oil Choice Matters
High smoke point oils help you get that restaurant-quality sear. They can handle intense pan temperatures. When oil smokes, it breaks down and adds bitter flavors to your steak. This also stops the crust from forming properly – the golden-brown layer that keeps juices in.
Don’t use extra virgin olive oil (smoke point: 375°F) for searing. It’s great for finishing touches but burns fast at high heat. For the best results, choose your oil wisely and use proper pan preheating techniques.
How to Properly Heat Your Pan
Mastering pan temperature is key to a great steak. If you don’t get it right, you might end up with uneven cooking or a steamed steak. Let’s explore the science and signs of perfect pan heating.
Importance of Preheating
Cold pans are the enemy of crust. Adding steak to a cold pan can make it steam instead of sear. This leads to a gray, lifeless exterior. For the best results:
- Preheat 3-5 minutes on medium-high (gas stoves heat faster than electric)
- Use the mercury test: Hold your hand 3 inches above the pan – you should feel intense heat within 2 seconds
- Avoid overheating: Smoke points vary by oil (see Section 5 for details)
Signs Your Pan is Ready
Look and listen for these unmistakable indicators:
| Stove Type | Preheating Time | Visual Cue | Sound Test |
|---|---|---|---|
| Gas | 3-4 minutes | Oil shimmers slightly | Water droplets dance & evaporate in 2 seconds |
| Electric | 5-6 minutes | Light wisps of smoke | Hissing on contact |
| Induction | 2-3 minutes | Rapid oil movement | Immediate sizzle |
If your oil smokes heavily before adding steak, remove the pan from heat briefly. Burnt oil creates bitter flavors. For induction users: Reduce heat to medium after preheating to prevent scorching.
Cooking Techniques for NY Steak
Take your pan-cooked NY steak to the next level with these top chef tips. A hot pan and a quality cut are essential. But it’s your technique that makes all the difference. Focus on two key areas: searing for a caramelized crust and butter basting for richness.
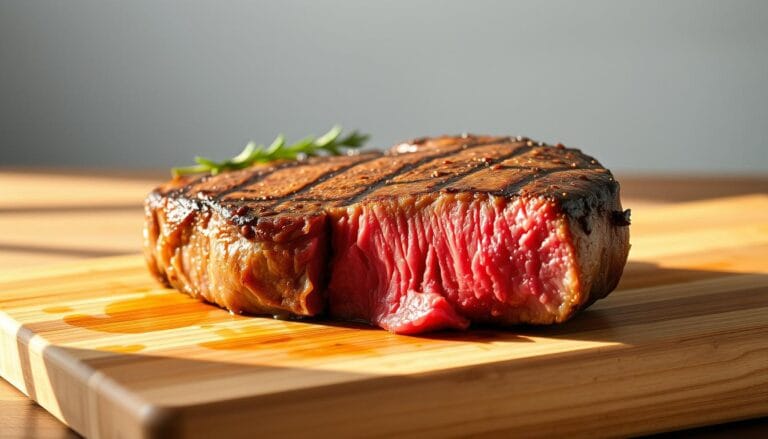
Searing for Maximum Flavor
Begin by pressing the steak firmly into the hot pan for 3-4 seconds. This ensures the steak makes full contact with the pan. It starts the Maillard reaction, which creates a crispy exterior.
Don’t move the steak right away. Let it get a deep brown crust for 2-3 minutes before flipping. It’s important to flip the steak every 90 seconds using tongs. This helps cook it evenly and prevents moisture loss. Keep the heat at medium-high, but lower it if you see smoke.
Basting with Butter and Herbs
In the last 2 minutes, add 3 tablespoons of unsalted butter to the pan. Include 2-3 sprigs of fresh thyme or rosemary and 2 crushed garlic cloves. Tilt the pan and spoon the butter over the steak often. This adds flavor to every part of the steak and keeps it tender.
Lower the heat to medium-low when basting. The butter should sizzle gently. If it starts to brown, take the pan off the heat for a bit. Remove the herbs before serving, as they can become bitter. Adding a splash of beef broth can add even more flavor.
Knowing When Your Steak is Done
Mastering steak doneness is key to becoming a great cook. Whether you like your steak rare or well-done, there are two easy ways to check. These methods ensure your NY strip stays juicy and full of flavor.
Using a Meat Thermometer
Digital meat thermometers are your secret weapon for precision. Stick the probe sideways into the thickest part of the steak, avoiding bones or fat pockets. For 1.5-inch cuts, check three areas to account for uneven cooking.
“A thermometer doesn’t lie – it’s the only way to guarantee consistent results every time,” advises Chef Michael Sullivan of The Grill Academy.
| Doneness Level | Internal Temp (°F) | Carryover Cooking* |
|---|---|---|
| Rare | 125-130 | +5°F |
| Medium Rare | 130-135 | +5°F |
| Medium | 135-145 | +3°F |
| Well Done | 150-160 | +0°F |
*Remove steak 3-5° below target temp – residual heat completes cooking during resting.
Visual Cues for Doneness
The finger test helps when tools aren’t available. Compare your steak’s firmness to these hand areas:
- Rare: Relaxed palm feels like raw steak
- Medium Rare: Base of thumb resists slightly
- Well Done: Tight thumb-palm connection
| Doneness | Center Color | Juice Color |
|---|---|---|
| Rare | Bright red | Bloody |
| Medium Rare | Warm red | Red-tinged |
| Medium | Pink | Clear pink |
| Well Done | Gray-brown | None |
Thick cuts often have gradient coloring. Check both the center and areas near the fat cap for accurate assessment.
Resting Your Steak After Cooking
You’ve seared your steak to perfection, but skipping this final step could undo all your hard work. Resting allows juices to settle back into the meat, creating a tender bite instead of a messy plate. Think of it as your steak’s “cooldown phase” – essential for locking in flavor.
Why Resting is Crucial
When heat hits muscle fibers, they tighten and push moisture toward the center. Resting gives these fibers time to relax through a process called thermal relaxation. As the steak cools slightly, juices redistribute evenly via capillary action – like nature’s sauce distribution system.
“Cutting into meat immediately is like popping a balloon – all the flavor escapes where you don’t want it.”
Optimal Resting Time
Use this formula: Rest for 1 minute per ½ inch of thickness. A 1.5-inch NY strip needs 7-8 minutes. For precision:
| Steak Thickness | Minimum Rest Time |
|---|---|
| 1 inch | 5 minutes |
| 1.5 inches | 7-8 minutes |
| 2 inches | 10 minutes |
Pro Tenting Tip: Loosely cover with foil, leaving space for steam to escape. Place the tented steak on a warm (not hot) plate to maintain temperature without softening the crust.
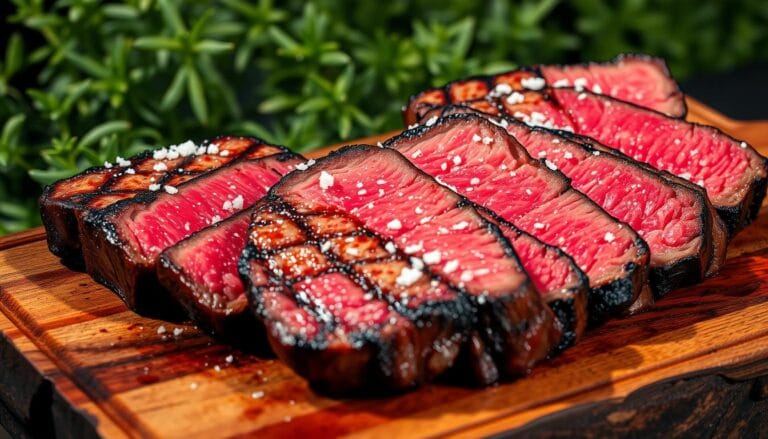
Slicing Your Steak for Maximum Flavor
How you slice your NY steak affects its tenderness and looks. Cutting it right keeps juices in and makes it look like a pro cooked it. Here’s how to make your steak look and taste amazing.

Best Techniques for Slicing
Identify the grain direction before cutting. Look for lines that run along the steak. Always cut across these lines for a tender steak.
Follow these steps for perfect slices:
- Let steak rest 7-10 minutes after cooking
- Place knife at a 90-degree angle to the grain
- Cut slices ¼”-½” thick with smooth strokes
| Knife Type | Blade Length | Best For | Maintenance |
|---|---|---|---|
| Chef’s Knife | 8-10″ | General slicing | Hone weekly |
| Slicing Knife | 12-14″ | Paper-thin cuts | Sharpen monthly |
| Utility Knife | 5-7″ | Portion control | Hand wash only |
Bias-cutting at 45 degrees makes elegant, wider slices. This is great for thicker cuts, showing off the seared surface.
Presentation Tips to Impress
Place slices in layers on warm plates. Drizzle juices around the steak, not on it. This keeps the crust crispy and adds moisture.
Make your dish stand out with:
- Microgreens or fried rosemary sprigs
- Edible flowers (nasturtiums or chive blossoms)
- Smoked sea salt sprinkled at the table
Make board sauces with steak drippings, melted butter, and herbs. Serve in small ramekins with the steak. This makes any meal feel like a special occasion.
Serving Suggestions for NY Steak
After perfecting your pan-seared NY steak, presentation and pairing choices elevate it from a meal to an experience. Balancing textures and flavors turns your kitchen creation into a restaurant-worthy plate. Let’s explore how to complement your steak with sides, sauces, and drinks that enhance its rich flavor.
Ideal Side Dishes and Pairings
Classic steakhouse sides like creamy spinach and garlic-roasted potatoes never go out of style. Their richness balances the steak’s savory notes. For lighter options, try:
- Grilled asparagus with lemon zest
- Quinoa salad with roasted vegetables
- Truffle fries for a gourmet twist
Pair wines based on your steak’s doneness. Medium-rare cuts shine with bold Cabernet Sauvignon, while well-done steaks pair better with smoother Merlot. Beer lovers can opt for malty amber ales or hoppy IPAs to cut through the fat.
Recommended Sauces and Toppings
Transform pan drippings into quick pan sauces in minutes. Deglaze with red wine or broth, then whisk in butter for a silky finish. Top your steak with:
- Blue cheese crumbles and caramelized onions
- Chimichurri for fresh herb brightness
- Sautéed mushrooms in garlic-thyme butter
For special occasions, drizzle béarnaise sauce over the steak or serve horseradish cream on the side. These additions add luxury without overshadowing the meat’s natural flavor.
Storing Leftovers Safely
Keep your steak’s flavor by following these safe storage tips. Whether it’s a single portion or a whole cut, handling it right stops foodborne illness. It also keeps the texture just right. Let’s see how to keep it fresh from fridge to plate.
Best Practices for Refrigeration
Here’s how to keep cooked steak fresh for 3-4 days, as the FDA recommends:
- Cool quickly: Let steak sit no longer than 2 hours at room temperature before refrigerating
- Choose your wrap: Vacuum-sealing blocks air exposure best, while parchment paper works for short-term storage
- Label clearly: Note the date using freezer-safe tape for easy tracking
Store meat on the refrigerator’s bottom shelf where temperatures stay consistently below 40°F. For frozen storage, double-wrap portions in aluminum foil before placing in freezer bags.
How to Reheat Without Drying Out
Use these methods to keep your steak moist:
- Oven method: Preheat to 250°F. Place steak on a wire rack above a water-filled baking sheet for 20-25 minutes
- Sous vide: Submerge vacuum-sealed steak in 130°F water bath for 45 minutes for medium-rare consistency
- Stovetop rescue: Sear cold steak 60 seconds per side in butter, then finish in a covered pan with broth
Avoid microwaving unless you enjoy chewing leather. If you must microwave, place a damp paper towel over the steak and use 50% power in 30-second intervals.
Common Mistakes to Avoid
Even the most skilled cooks can make mistakes when pan-searing a NY steak. Small errors can turn a great dish into a tough one. Let’s look at common mistakes and how to avoid them.

Overcooking Your Steak
Overcooking is the #1 reason steaks lose their juicy appeal. Use a meat thermometer to avoid this. Take the steak out at 125°F for medium-rare. It will get to 130°F while it rests.
If you’ve overcooked it, try these tips:
- Slice thinly against the grain to minimize chewiness
- Serve with a rich pan sauce or compound butter
Other mistakes include flipping the steak too much and overcrowding the pan. Make sure to leave at least 1 inch between steaks for good heat flow.
Not Seasoning Enough
Not seasoning enough can make your steak taste bland. Use 1/2 to 1 teaspoon of kosher salt per pound on both sides. For the best taste:
- Salt just before cooking to prevent moisture loss
- Pair with coarse black pepper after searing
Seasoning sticks best to a dry surface. Pat your steak dry with paper towels before salting.
Final Tips for Perfect NY Steak
Mastering pan-seared New York strip steak is all about balance. Start with the basics like using a cast iron skillet and checking internal temperatures. Then, try new flavors to take your steak to the next level.
Consider dry-aging steaks at home for a deeper flavor. Or, add earthy complexity with bold coffee rubs.
Oven-Finishing for Thicker Cuts
For thicker steaks, finish them in the oven after searing. Move the skillet to a 400°F oven for 3-5 minutes. This ensures even cooking without burning the crust.
This method is great with sides like garlic butter shrimp or roasted veggies.
Building Confidence Through Practice
Every cook gets better with practice. Keep track of your seasoning, sear times, and resting periods. If a steak is off, tweak one thing next time.
Sharing meals with friends can help you grow. You learn from both successes and failures.
Make sure your kitchen has the right tools, like instant-read thermometers and sharp knives. Pair your steak with sides like herb-roasted potatoes or a fresh arugula salad. With patience and curiosity, you’ll make every dinner feel like a steakhouse experience.
FAQ
What’s the ideal thickness for pan-searing a NY strip steak?
Can I use olive oil to cook a NY steak in a pan?
How do I know when my pan is hot enough for cooking?
Should I flip the steak multiple times while cooking?
What internal temperature should I target for medium-rare doneness?
Why is resting the steak after cooking important?
How do I slice a NY strip steak properly?
What are the best side dishes to pair with pan-seared NY steak?
Can I reheat leftover steak without drying it out?
What’s the biggest mistake people make when cooking NY strip steak?
How much salt should I use when seasoning a NY strip?
Can I finish cooking a thick NY strip in the oven?
For more cooking tips, stay connected with us. We also recommend the cookbook Skinnytaste Simple: Easy, Healthy Recipes with 7 Ingredients or Fewer
For more Recipes about Steak ?
Did You try our recipe ?
There are no reviews yet. Be the first one to write one.